Sunday, February 28, 2010
Sketch Girl #13 is up!

Tuesday, February 23, 2010
Another Treat Holder

So I’m back with another treat holder because well who couldn’t use a cute simple gift. Plus I’m a little addicted to my GCD papers lately especially the black and white. This is a design I made as I went, but hopefully I can walk you through it, if you’d like to give it a go, since its pretty simple.

To make the small pocket inside I cut a 6 by 3 inch rectangle. I folded at a ¼ inch in from each long side. Then I folded down the middle and again ¼ inch below that.

Snip the two folds in the center as seen in the picture and add adhesive. The two side flaps sit on top of each other and one side will be longer than the other like a library pocket. Punch a hole on each side of the pocket at the top.

The outside is simple a 3.5 by 8 inch rectangle folded at 3.5 and then again at 4.5. You will need to punch holes in the middle sides of the top of the container. Thread the ribbon through the pocket then up through the outside piece and tie a bow.

Decorate the front and inside pocket as desired. I choose some GCD Studios paper, a chipboard circle and a tag for the front.
Saturday, February 20, 2010
Tea is Wise Tag Album

Friday, February 19, 2010
Stitching on a LO

GCD Studios Basket Tutorial


GCD Studios and Floss Necklace with Tutorial

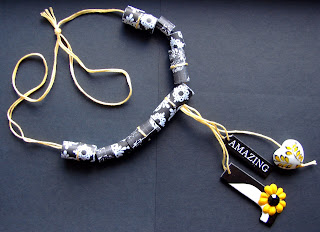
There has been so much inspiration at the GCD Studios blog lately that I decided I really needed to play with some GCD goodies. I wanted to combine their chipboard with their paper but in a bit of a different way which made me think of the Moxie Fab floss challenge because it hit me. A necklace! I’m sure at least some of you have seen these paper beads before and they are very simple to make but I want to walk you through the project just in case you’d like to play with paper beads.
First I picked out my charms. A hand painted bead from an impulse buy at the craft store. Then I turned to my GCD Shades of Black chipboard. Now as other fans of GCD may know the chipboard is self adhesive which I love because it meant a way to add some quick texture to the back by covering the back with some beautiful flocked paper from the Bright Skies collection. I also tied my yellow in with a little flower on the J. I poked a hole with a paper piercer in each piece and then strung them.
To make the paper beads you simply cut paper strips to your desired thickness (I used ½, 1, and 1 ½ inch widths for my beads) and at least six inches long. Put a small bit adhesive on the end of the side you would like to be shown. Then put some additional adhesive on the other side. Roll around a pen or other utensil.

Now these paper beads made from some gorgeous black and white GCD paper are fab but I wanted to add a bit of interest to them and pull my yellow back in so I decided to give the beads a stitched look with floss. To do this you only need to make a few stitches on the tail end of the bead before you finish rolling.
I wanted these to be dangly charms, not coming right off the necklace so I needed a way to attach the string to the main necklace string. Well typing it on is simple enough but not quite so pretty. So I made an extra large bead again using floss stitching then I cut a slit to the middle where the paper met. Next I put the tied together chipboard charms over the necklace string then slid the charm string to the center of the large bead.


Now what I’m sure you’re all thinking is: Can I wear this? Well I’ve got to admit it’s a little delicate because it’s made of paper after all. But you can seal paper beads with modge podge to make them more durable and as for my necklace my sister is a big fashionista and I know she would love to display it on a necklace form just as a conversation piece. So that’s it my floss project hope it inspires you to take another look at some supplies you have laying around.
Tuesday, February 16, 2010
Cupcake Craft and Pile It On

Card Patterns, Pink Elephant, and Frosted Designs

Monday, February 15, 2010
Sketch Girl #12 is up!

Saturday, February 13, 2010
Challenges with Love Birds

Thursday, February 11, 2010
Sassafras Lass Love Challenge

Wednesday, February 10, 2010
A Card for a Special Girl


