Saturday, October 28, 2017

24 Cards with Doodlebug Booville 6x6 Paper Pad


Hello crafty friends! Today I have another 6x6 Paper Pad tutorial featuring Doodlebug. I am obsessed with Doodlebug 6x6 pads because it is so easy to create a bunch of cards without using many extra supplies. I think their designs are adorable and I can easily whip up a bunch of cards for card drives like Cards for Hospitalized Kids. If you want more info on donating card please check out my Card Drive Resources page. So today I'm using Doodlebug Booville 6x6 pad while making 24 cards! Once I had made the 24 cards there was very little left over and I really felt like I got the most out of my pad. To see it all in action check out the video.


I made 2 of most designs but there are some unique cards. Keep scrolling to see pictures of different designs and get some measurements. 

Measurements for this card (in inches): A2 (4 1/4 by 5 1/2) card base, largest layer 4 by 5 1/4, patterned layer 3 3/4 by 5, orange strip 2 by 4 1/2

Measurements for this card (in inches): A2 (4 1/4 by 5 1/2) card base, largest layer 4 by 5 1/4, purple rectangle 2 5/8 by 4, strip 2 by 5 1/4

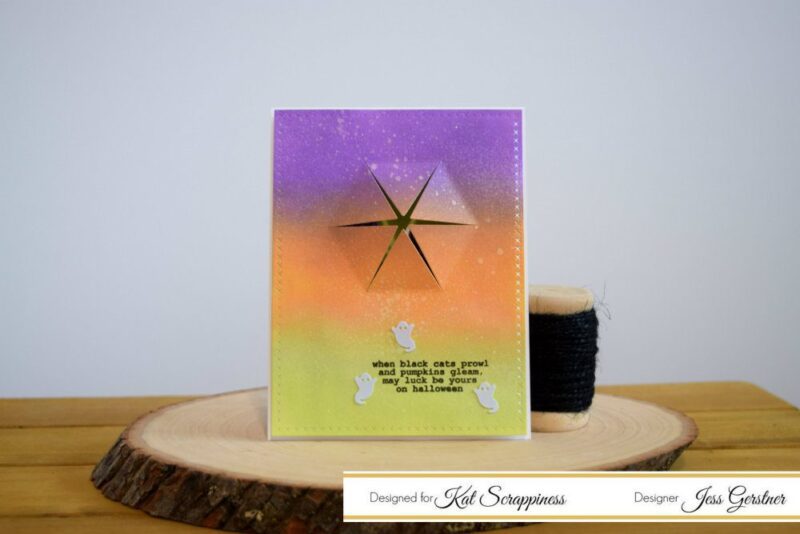
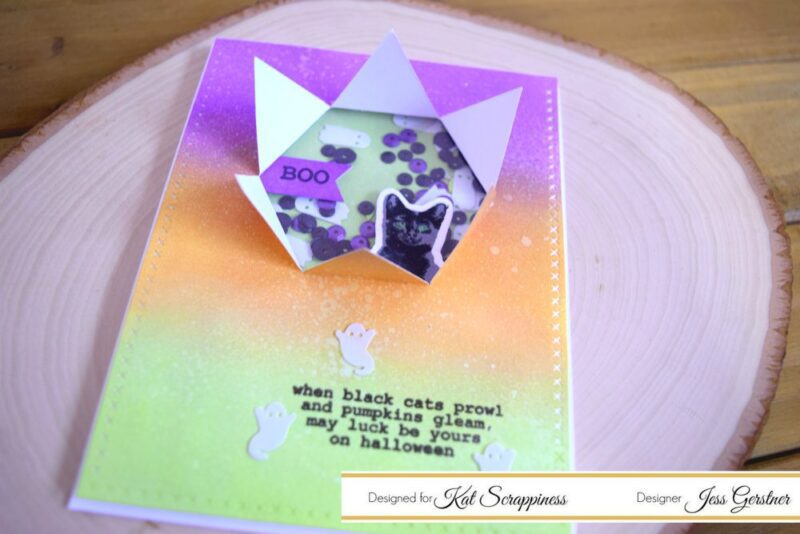
Measurements for this card (in inches): A2 (4 1/4 by 5 1/2) card base, largest layer 4 by 5 1/4, square 3 by 3, cut apart 2 by 2

Measurements for this card (in inches): card base 5 1/2 by 5 1/2, largest layer 5 1/4 by 5 1/4

Measurements for this card (in inches): A2 (4 1/4 by 5 1/2) card base, largest layer 4 by 5 1/4, orange strip 2 by 4 1/2

Measurements for this card (in inches): A2 (4 1/4 by 5 1/2) card base, largest layer 4 by 5 1/4, blue strip 2 by 4 3/4

Measurements for this card (in inches): A2 (4 1/4 by 5 1/2) card base, strip 2 by 5 1/4, largest layer 4 by 5 1/4, square 3 by 3, cut apart 2 by 2

Measurements for this card (in inches): A2 (4 1/4 by 5 1/2) card base, largest layer 4 by 5 1/4, patterned layer 3 3/4 by 5, purple rectangle 2 5/8 by 4

Measurements for this card (in inches): A2 (4 1/4 by 5 1/2) card base, largest layer 4 by 5 1/4, patterned layer 3 3/4 by 5, square 3 by 3, cut apart 2 by 2

Measurements for this card (in inches): A2 (4 1/4 by 5 1/2) card base, largest layer 4 by 5 1/4, strips 3/4 by various lengths

Measurements for this card (in inches): A2 (4 1/4 by 5 1/2) card base, strip 2 by 5 1/4, largest layer 4 by 5 1/4, square 3 by 3

Monday, October 16, 2017

10 Cards 1 Kit | Hero Arts My Monthly Hero September 2017 Kit


Today I'm sharing the 10 cards I created with the Hero Arts September 2017 Card Kit. I have created a video tutorial to accompany the cards. It is a quite a long video, but I hope you will find the information and ideas helpful.

The kit is sold out now and unavailable but I wanted to share these cards and video as an inspiration to those who have purchased the kit. I am however selling most of my kit. Please see the end of the video for details. I am also sharing still images of all the cards. All cards are A2 sized.

Fall Card with Hero Arts September 2017 Kit by Jess Crafts My Monthly Hero

Fall Card with Hero Arts September 2017 Kit by Jess Crafts My Monthly Hero

Fall Card with Hero Arts September 2017 Kit by Jess Crafts My Monthly Hero

Fall Card with Hero Arts September 2017 Kit by Jess Crafts My Monthly Hero

Fall Card with Hero Arts September 2017 Kit by Jess Crafts My Monthly Hero

Fall Card with Hero Arts September 2017 Kit by Jess Crafts My Monthly Hero

Fall Card with Hero Arts September 2017 Kit by Jess Crafts My Monthly Hero

Fall Card with Hero Arts September 2017 Kit by Jess Crafts My Monthly Hero

Fall Card with Hero Arts September 2017 Kit by Jess Crafts My Monthly Hero

Fall Card with Hero Arts September 2017 Kit by Jess Crafts My Monthly Hero


Friday, October 13, 2017

10 Cards 1 Kit | Love from Lizi October 2017 Kit


Hello crafty friends! Today I have the cards I made with the Love from Lizi October 2017 Card Kit to share with you. This kit has a TON of supplies, but it is sold out. If you are impressed with the quantity of awesome products in the kit then be sure to keep an eye out for the November kit or buy some of the contents separately in the Love from Lizi shop. In the video below, I am sharing how I made these 10 projects with the kit. 


I'm also sharing pictures of the of individual cards. Most cards are A2 size 4.25 by 5.5 inches. The square cards are 4.25 by 4.25 inches.


Saturday, October 7, 2017

Kat Scrappiness World Cardmaking Day Blog Hop


Hello crafty friends! Thank you so much for joining in on the World Cardmaking Day fun with KatScrappiness! Today all of the designers are participating in a fun blog hop with their inspiration and take on the first Kat Scrappiness Mood Board Challenge! There will be lots of prizes to be won and several chances to win. Make sure you comment on all the designers blog posts today for several chances to win and then make a card (or any project) inspired from our mood board and link up to the Kat Scrappiness blog before Monday October 9th for a chance at winning one of several prizes! All winners will be announced at the Kat Scrappiness blog on Tuesday October 10th by Noon PST. Don't forget you can get 15% off in the KatScrappiness shop today only! Use Code “IMAKECARDS” at checkout!

Here is the Mood Board that is apart of the challenge and what has inspired my projects today!


And here is another look at my project

I hope you have been inspired by my project today! Below is the list of all the designers participating in the blog hop.
Kat Scrappiness Designers 
Jess 

To go to the Kat Scrappiness Shop Click HERE and save 15% off your total purchase today (10/7/17) only! To go to the Mood Board Challenge blog post click HERE and enter your card for a chance to win fabulous prizes! 


Tuesday, October 3, 2017

Halloween Pop Out Shaker Card


Hello crafty friends! Today I have a fun Halloween projects using some new stamps, dies and sequins from Kat Scrappiness. For today's card I will be using the new Toil and Trouble stamp set, the Cross Stitched rectangles, the Pop Out die and some of the Halloween sequins.


The inspiration for this card was the new Pop Out die. I thought it would be fun to hide a shaker behind this interactive card element. I really wanted to use some of the new Halloween stuff as well. So I decided to create a Halloween shaker card that would be a bit simple looking at first and open to a fun surprise. I have a full video tutorial for you today that you can watch below or watch on YouTube.

Video:

I started by stamping the layered cat from the Kat Scrappiness Toil and Trouble stamp set. I knew I wanted the stamp and some sequins to be the surprise underneath. I created a bright and colorful Halloween background using Distress Oxide Inks and shimmer spray. Then I die-cut this background with the Cross Stitched Rectangles and the Pop Out die. I also heat embossed a sentiment from the stamp set on the panel.


Now I was ready to create the shaker. I adhered my cat then the acetate window so none of the sequins would catch on him. I added some Ghostly Greetings sequins to the shaker and embellished the card with some of the ghosts from the Boo to You mix. I hope you enjoyed my card and tutorial. I encourage you to pop over to the shop and check out these fun new products.